

Save This For Later
Warm weather is just around the corner, and parents everywhere are looking for fun summer crafts for kids to keep them busy outdoors. One of the most popular options? Tie-dye! But when you’re trying it with kids, you need patterns that are simple, safe, and fun.
That’s why we’ve put together this guide to the 10 easiest tie-dye patterns for kids. From classic spirals and bullseyes to playful designs like hearts and sunflowers, these easy tie-dye ideas come with step-by-step instructions and video tutorials so your family can enjoy a colorful DIY project together.
💡Explore more creative at-home activities for kids beyond tie-dye in our complete resource.
Easy Tie-Dye Patterns for Kids
Note: Before we dive into the 10 easy tie-dye patterns for kids, make sure you have the basics ready: a white cotton shirt, rubber bands, gloves, plastic wrap, a non-toxic tie dye kit, and soda ash for washing. That’s all you need for a simple DIY tie-dye shirt project at home! (Full supply list below.)
1. Spiral Tie Dye Pattern
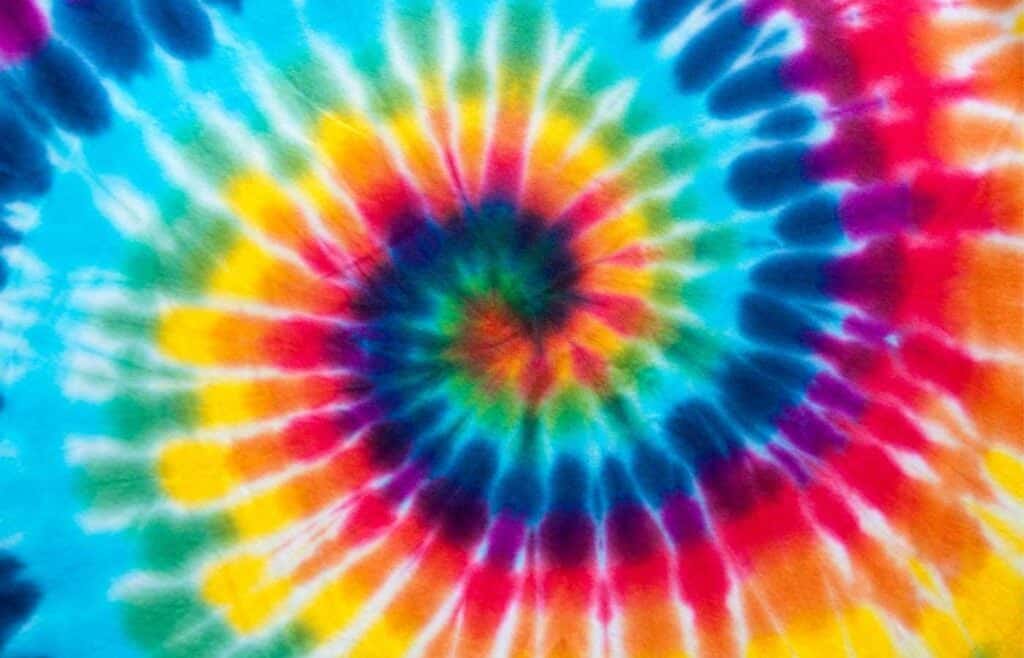
When you think of tie dye shirts, you probably think of this design. A classic spiral tie-dye pattern typically features a spiral shape with the bright colors radiating outwards from the center in a diagonal fashion. The colors blend into each other to create a mesmerizing, almost psychedelic effect.
The overall effect of the pattern is a swirling, twisting design that looks like a series of concentric circles that blend into each other.
It’s a classic and timeless design that will always be popular among those who love colorful and unique fashion.
How to Make a Spiral Tie-Dye Pattern
Approx. 20–30 minutes (hands-on), plus 6–8 hours drying. 6 hours and 30 minutes
By following these steps, you can create a mesmerizing, swirling spiral pattern on your tie-dye shirts that is sure to catch the eye and impress anyone who sees it.
- Wash your white shirt or fabric and soak in soda ash for 20 minutes.
(Use 1 cup per gallon of water.) Your fabric should be damp, but not soaking wet. (The dye has an easier time saturating the fabric when it’s wet.)
- Put on your rubber gloves!
- Pinch the center of the fabric with your thumb and forefinger and twist it in a clockwise direction to create a tight spiral.
Keep twisting until the entire fabric is twisted into a spiral shape.
- Use rubber bands to hold the spiral in place.
Wrap rubber bands every few inches from the center to the edge of the fabric, creating a series of pie-shaped sections.
- Apply dye to the fabric.
For a classic spiral pattern, apply one color to the center of the spiral and then add other colors in a circular fashion, following the twists of the fabric. Make sure to saturate the fabric thoroughly with dye.
- You can use your dye to make a smiley face, pokemon ball, or other simple drawing, and see how it comes out!
- Once the dye is applied, carefully place the shirt in a plastic bag or wrap it in a piece of plastic wrap to prevent it from drying out.
Let the shirt sit for at least 6-8 hours or overnight to allow the dye to set.
- Here are instructions for how to wash and care for your tie-dye shirt.
2. Heart Tie Dye Pattern
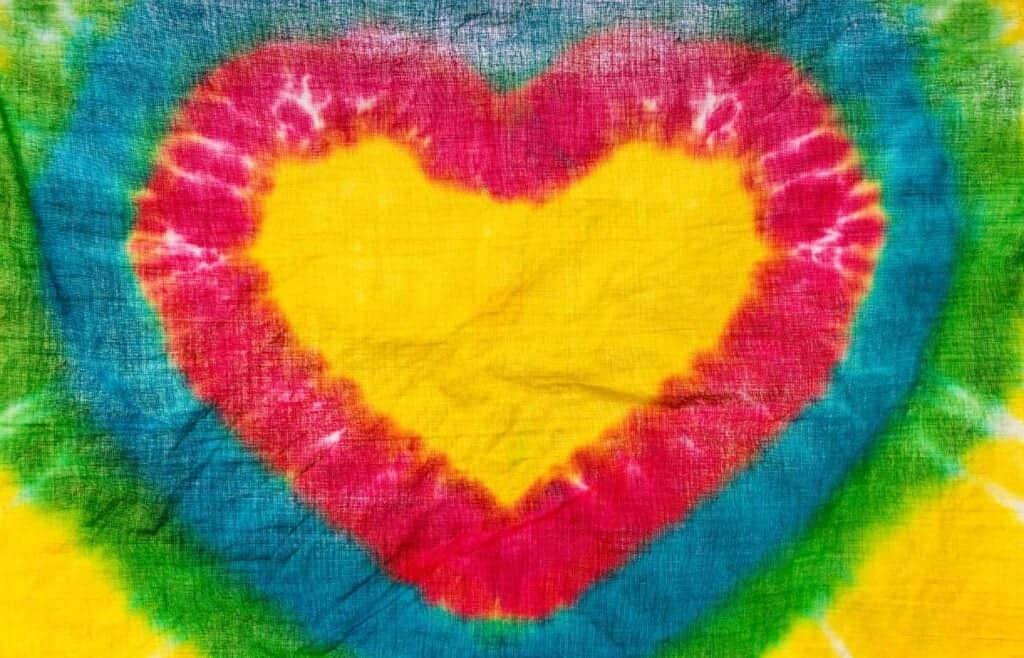
A heart tie-dye pattern is a design that features one or more hearts in a colorful tie-dye pattern on the fabric, and it’s perfect for kids! This is definitely one of our favorite tie-dye designs.
This pattern is created by folding the fabric in a way that creates a heart shape and then applying dye to the fabric.
Here are the steps:
- Wash your plain white t-shirt or fabric and soak in soda ash for 20 minutes. (Use 1 cup per gallon of water.) Your fabric should be damp, but not soaking wet. (The dye has an easier time saturating the fabric when it’s wet.)
- Put on your latex gloves!
- Fold the t-shirt in half.
- With a washable market, draw half of a heart.
- Begin to make small folds and gather the fabric along the heart.
- Place a rubber band where the line of the heart is.
- Continue placing rubber bands to create sections.
- Apply your dye to one side with desired colors. The video above shows a rainbow pattern.
- Flip it over and apply dye to the other side.
- Once the dye is applied, carefully place the shirt in a plastic bag or wrap it in plastic wrap to prevent it from drying out. Let the shirt sit for at least 6-8 hours or overnight to allow the dye to set.
- Here are instructions for how to wash and care for your tie-dye shirt.
This fun and playful design that allows them to express love and affection, and it’s surprisingly easy to create!
Tie-dye shirts also make a fun activity at a child’s birthday celebration. Check out our roundup of the best birthday party activities for kids for more ideas.
3. Bullseye Tie Dye Pattern
A bullseye tie dye pattern typically features a circular shape with concentric rings of color that radiate outwards from the center. The center of the circle is usually a single color, while the rings around it can be one or more different colors. The pattern resembles a target or bullseye, hence its name.
When creating a bullseye tie dye pattern, the center is typically dyed first with one color, and then additional colors are added in rings around the center. The final result is a colorful and eye-catching design that can be used on a variety of fabrics, from t-shirts to bedding to accessories.
To create a bullseye tie dye pattern, follow these steps:
- Wash your t-shirt or fabric and soak in soda ash for 20 minutes. (Use 1 cup per gallon of water.) Your fabric should be damp, but not soaking wet. (The dye has an easier time saturating the fabric when it’s wet.)
- Put on your gloves!
- Grab the center of the fabric and lift it up so it’s draping down.
- Place a rubber band every few inches until you have a long piece of fabric with several sections.
- Apply dye to the fabric. Make sure to saturate the fabric thoroughly with dye.
- Flip it over and add more dye.
- Once the dye is applied, carefully place the shirt in a plastic bag or wrap it in plastic wrap to prevent it from drying out. Let the shirt sit for at least 6-8 hours or overnight to allow the dye to set.
- Here are instructions for how to wash and care for your tie-dye shirt.
That’s it! You should now have a beautiful bullseye tie dye pattern on your fabric. Experiment with different colors and dye techniques to create your own unique designs.
4. Stripes Tie Dye Pattern
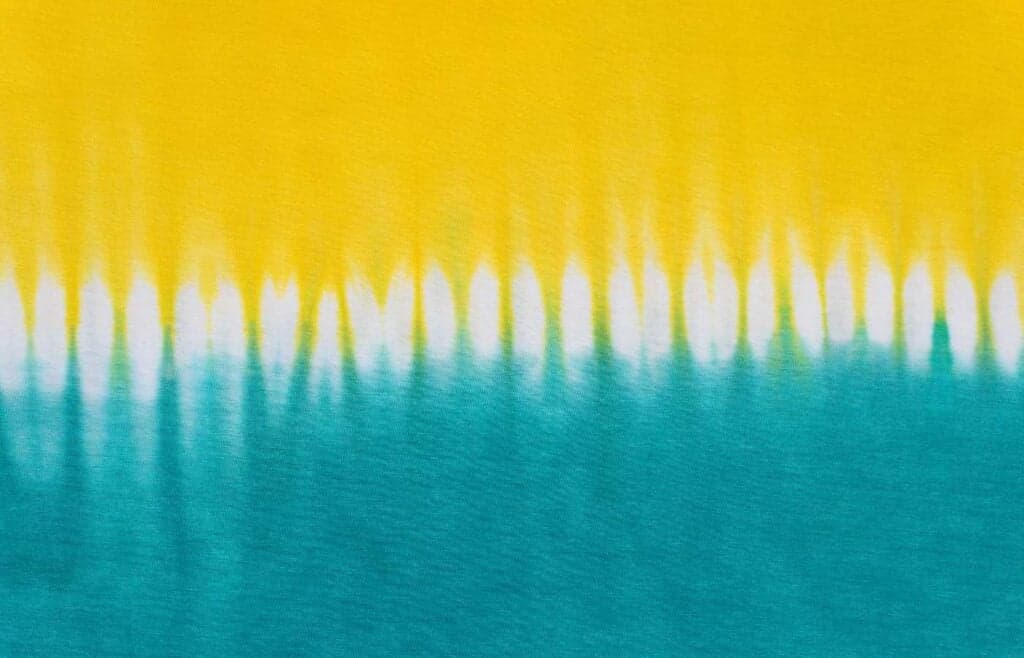
A striped tie-dye pattern is a design that features stripes of color that alternate with stripes of white or another light color. This pattern is created with an accordion fold and then applying dye to specific sections of the fabric.
To create a striped tie-dye pattern, you can use a variety of folding and tying techniques, depending on the look you want to achieve. You will need to fold or twist the fabric and apply the dye in a way that creates stripes.
Striped tie-dye patterns can be created using any combination of colors, from bold and bright to pastel and subtle. The stripes can be wide or narrow, and can run vertically or horizontally across the fabric.
Here are the steps to create a basic striped tie-dye pattern:
- Wash your t-shirt or fabric and soak in soda ash for 20 minutes. (Use 1 cup per gallon of water.) Your fabric should be damp, but not soaking wet. (The dye has an easier time saturating the fabric when it’s wet.)
- Put on your rubber gloves!
- Decide how you want your stripes to run. You can create horizontal stripes or vertical stripes (or diagonal stripes!) depending on your preference.
- Fold the fabric accordion-style, creating a series of folds that run the length of the fabric. Make sure that the folds are all the same size for consistent stripes.
- You can fold horizontally, vertically, or diagonally.
- Apply elastic bands at regular intervals along the length of the fabric to hold the folds in place. You can use as many rubber bands as you like to create wider or narrower stripes.
- Apply the dye to the fabric. You can use a single color or multiple colors to create your stripes. Apply the dye in a stripe pattern, making sure to fully saturate the fabric. You can use a dye bottle or a brush to apply the dye.
- Once the dye is applied, carefully place the shirt in a plastic bag or wrap it in plastic wrap to prevent it from drying out. Let the shirt sit for at least 6-8 hours or overnight to allow the dye to set.
- Here are instructions for how to wash and care for your tie-dye shirt.
By following these steps, you can create a basic striped tie-dye pattern. You can experiment with different folding and tying techniques to create more complex stripe patterns. Remember to be creative and have fun with your designs!
5. Crumple Tie Dye Pattern
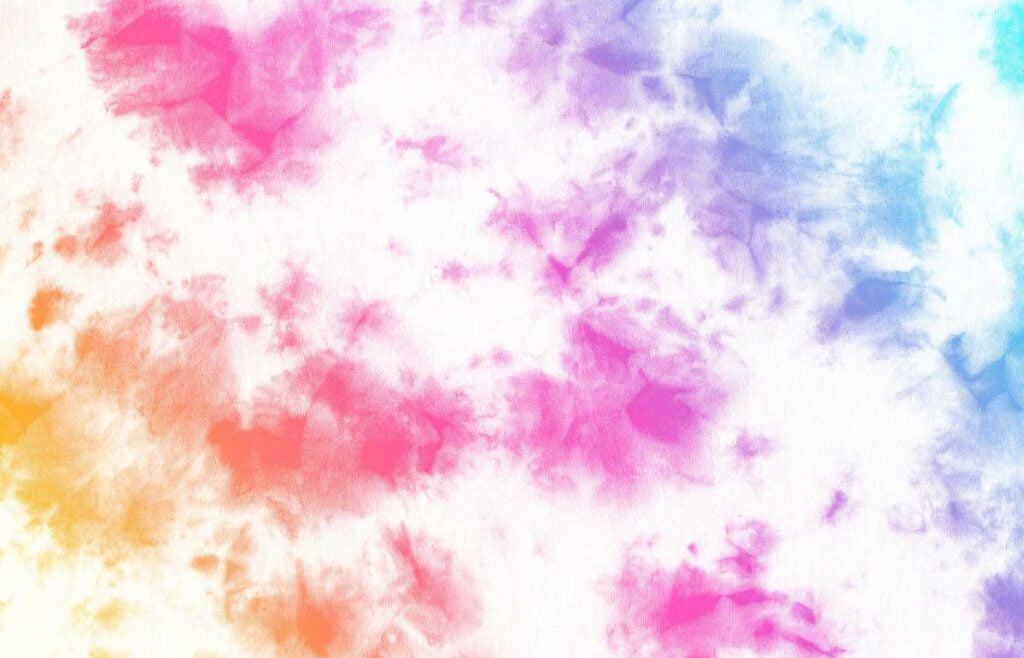
“Crumple” is probably the easiest tie dye pattern. It’s a great way to get even the youngest kids tie dyeing. A crumple tie-dye pattern is a random and abstract design that creates a unique, textured look on the fabric.
This pattern is achieved by scrunching up the fabric in a random manner before dyeing it, which results in a variety of color and texture variations throughout the fabric.
Here are the steps to make a crumple tie-dye pattern:
- Wash your t-shirt or fabric and soak in soda ash for 20 minutes. (Use 1 cup per gallon of water.) Your fabric should be damp, but not soaking wet. (The dye has an easier time saturating the fabric when it’s wet.)
- Put on your gloves!
- Lay the t-shirt flat on a clean work surface and use your hands to scrunch and crumple the fabric randomly. Make sure to create a variety of folds and wrinkles throughout the shirt, as this will create the unique and textured look of the crumple tie-dye pattern.
- Once you have scrunched up the fabric to your liking, use rubber bands to secure the fabric in place. You can create as many or as few sections as you like, depending on the desired effect.
- Mix up your desired dye colors according to the manufacturer’s instructions. You can use one color or multiple colors for a more vibrant and colorful look.
- Apply the dye to each section, making sure to saturate the fabric with the dye and cover all the sections. You can use a dye bottle or a paintbrush to apply the dye.
- Once the dye is applied, carefully place the shirt in a plastic bag or wrap it in plastic wrap to prevent it from drying out. Let the shirt sit for at least 6-8 hours or overnight to allow the dye to set.
- Here are instructions for how to wash and care for your tie-dye shirt.
The resulting crumple tie-dye pattern will be a unique and abstract design with a variety of color and texture variations throughout the fabric. This pattern is perfect for creating a casual and fun t-shirt with a relaxed and carefree vibe.
If your kids loved this easy design, they might also enjoy trying out our simple science experiments for kids that can be done right at home.
6. Chevron (V-Shape) Tie Dye Pattern
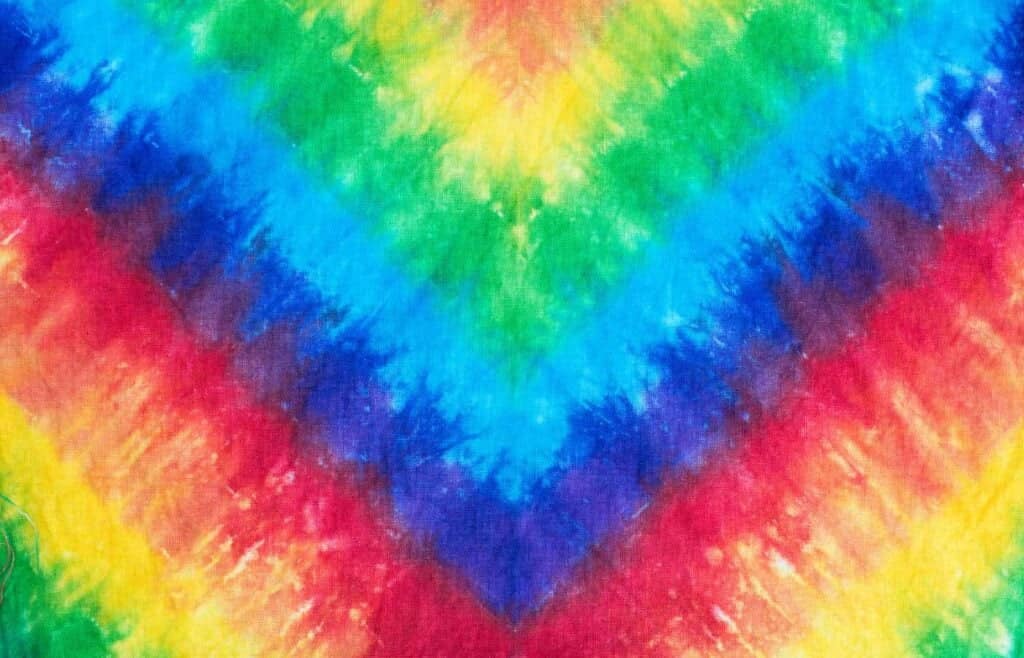
A chevron tie-dye pattern is a design that features a series of V-shaped lines that create a zigzag or chevron pattern on the fabric.
It is a popular tie-dye pattern that can be created using various colors and is characterized by its bold and graphic look.
The chevron pattern can be applied to different fabric items, including shirts, scarves, tote bags, and more, making it a versatile design option.
Here are the steps:
- Wash your t-shirt or fabric and soak in soda ash for 20 minutes. (Use 1 cup per gallon of water.) Your fabric should be damp, but not soaking wet. (The dye has an easier time saturating the fabric when it’s wet.)
- Put on your gloves!
- Lay the shirt flat and fold it in half vertically.
- Use a washable marker to draw a diagonal straight line from the top of the shoulder to the center of shirt.
- Start at the center of the shirt where the marker appear, and being creating small folds and gathering the fabric along the diagonal you created.
- Place rubber bands around the fabric to create several different sections.
- Apply the colors of tie dye you desire.
- Flip the fabric over and apple more colors.
- Once the dye is applied, carefully place the shirt in a plastic bag or wrap it in plastic wrap to prevent it from drying out. Let the shirt sit for at least 6-8 hours or overnight to allow the dye to set.
- Here are instructions for how to wash and care for your tie-dye shirt.
7. Sunflower Tie Dye Pattern
A sunflower tie-dye pattern is a design that resembles a sunflower. The design usually features a large circular shape in the center, with various colors radiating outwards from it like the petals of a sunflower. This pattern can be created using different colors, but yellow and green are typically used to give it a more authentic sunflower look.
- Wash your t-shirt or fabric and soak in soda ash for 20 minutes. (Use 1 cup per gallon of water.) Your fabric should be damp, but not soaking wet. (The dye has an easier time saturating the fabric when it’s wet.)
- Put on your gloves!
- Pinch the center of the fabric with your thumb and forefinger and twist it in a clockwise direction to create a tight spiral. Keep twisting until the entire fabric is twisted into a spiral shape.
- No need to apply rubber bands!
- Apple a circle of black dye to the center of the spiral.
- Apply yellow dye in the shape of sunflower leaves around the black circle.
- Outline the border of the leaves with another color like green.
- Fill in the rest of the t-shirt or fabric with the color of your choice. The tutorial above uses blue.
- Once the dye is applied, carefully place the shirt in a plastic bag or wrap it in plastic wrap to prevent it from drying out. Let the shirt sit for at least 6-8 hours or overnight to allow the dye to set.
- Here are instructions for how to wash and care for your tie-dye shirt.
For even more screen-free fun, explore our complete guide to at-home activities for kids.
8. Eyeball Tie Dye Pattern
An eye-ball pattern tie-dye shirt is a design that resembles one eye in the center of the shirt. Kids will love this “eye-catching” design!
Here are the steps:
- Wash your t-shirt or fabric and soak in soda ash for 20 minutes. (Use 1 cup per gallon of water.) Your fabric should be damp, but not soaking wet. (The dye has an easier time saturating the fabric when it’s wet.)
- Put on your gloves!
- Lay your T-shirt flat in your work area.
- Fold it in half vertically.
- Using a washable marker, draw half of a large eye ball. (See video tutorial above.)
- Carefully fold and gather your shirt along the lines of the design you drew.
- Apply rubber bands along the lines you drew.
- Place additional rubber bands to create several sections.
- Apply your dye as desired. Use different colors for the different sections.
- Once the dye is applied, carefully place the shirt in a plastic bag or wrap it in plastic wrap to prevent it from drying out. Let the shirt sit for at least 6-8 hours or overnight to allow the dye to set.
- Here are instructions for how to wash and care for your tie-dye shirt.
9. Double Peacock Tie Dye Pattern
A peacock tie-dye pattern is a design that features vibrant colors arranged in a pattern that resembles the feathers of a peacock. This pattern typically involves shades of blue, green, and purple arranged in a circular pattern, but you can use any colors you’d like.
Here are the steps:
- Wash your t-shirt or fabric and soak in soda ash for 20 minutes. (Use 1 cup per gallon of water.) Your fabric should be damp, but not soaking wet. (The dye has an easier time saturating the fabric when it’s wet.)
- Put on your gloves!
- Fold your t-shirt in half.
- Underneath the sleeve, use washable marker to draw a half circle.
- Carefully fold and gather the t-shirt along the marker shape you’ve drawn.
- Place rubber bands along the fabric to create separate sections.
- Apply the dye colors your want to each section.
- Once the dye is applied, carefully place the shirt in a plastic bag or wrap it in plastic wrap to prevent it from drying out. Let the shirt sit for at least 6-8 hours or overnight to allow the dye to set.
- Here are instructions for how to wash and care for your tie-dye shirt.
If your kids loved tie-dye, they’ll also love these handmade crafts to make and sell.
10. Fan Fold Tie Dye Pattern
A fan fold tie-dye pattern is a design that involves folding the fabric back and forth in an accordion-style fold, creating a “fan” shape. This pattern can be used on a variety of different fabric items, including shirts, skirts, and even napkins or towels.
Here’s how to do it:
- Wash your t-shirt or fabric and soak in soda ash for 20 minutes. (Use 1 cup per gallon of water.) Your fabric should be damp, but not soaking wet. (The dye has an easier time saturating the fabric when it’s wet.)
- Put on your gloves!
- Grab the t-shirt under the sleeve, about halfway down, and pull it. Gather the rest of the t-shirt in the opposite direction.
- Carefully create folds and gather the fabric together.
- Place rubber bands along the fabric to create separate sections.
- Apply the dye colors your want to each section.
- Once the dye is applied, carefully place the shirt in a plastic bag or wrap it in plastic wrap to prevent it from drying out. Let the shirt sit for at least 6-8 hours or overnight to allow the dye to set.
- Here are instructions for how to wash and care for your tie-dye shirt.
Want to take your skills a step further? Try these indigo tie-dye techniques for a fresh twist on the classics.
We hope you loved all the different tie dye patterns on this list! Tie-dying is so much fun, and it’s a creative activity that kids of all ages can enjoy. Not only is it a great summer outdoor activity, but it also helps to encourage creativity, experimentation, and self-expression in kids.
We hope that this article made it easy to find tie-dye designs that your child will love. By following these 10 easy tie-dye patterns for kids, you can help your child create unique and colorful clothing and accessories that they can show off all summer long.
From all of us here at Milwaukee With Kids, happy tie-dying!
Tie-dye also makes a fantastic group craft. If you’re planning for older kids, check out our tie-dye party ideas for kids.
Full Materials List
What You’ll Need for Tie-Dye with Kids
Here’s a full supply checklist so you can set up your space before your kids start creating:
- White cotton t-shirts or fabric (best for making DIY tie-dye shirts)
- Non-toxic tie dye kit (safe for kids)
- Rubber bands (to section off patterns)
- Plastic squeeze bottles (for applying dye)
- Buckets or tubs (to soak fabric in soda ash)
- Gloves (a must-have for kids and adults)
- Plastic tablecloth or garbage bags (to protect your workspace during this outdoor craft)
- Plastic wrap or zip-top bags (to keep designs damp while dye sets)
- soda ash (optional, helps keep colors vibrant)
Families can set this up outside and make it a mini family tie-dye party – a great outdoor craft for kids on a warm day.
Troubleshooting Tips
Troubleshooting Common Tie-Dye Problems
- Colors bleeding together: Use fewer colors and keep sections separate with rubber bands. This trick works great when making DIY tie-dye shirts with kids.
- Muddy results: Stick with 2–3 colors that sit next to each other on the color wheel. (A tip we love for tie-dye parties with kids!)
- Uneven dye: Always start with damp fabric so the dye saturates evenly.
- Faded colors: Let your shirt sit overnight before rinsing. Cold water helps keep your outdoor craft creations bright.
Here are step-by-step instructions for how to wash tie-dye.
Safety Note
Is Tie-Dye Safe for Kids?
Yes – as long as you use a Non-toxic tie dye kit and supervise the process.
- Best for ages 5 and up (younger kids can help with rubber bands).
- Always wear gloves to avoid stained hands.
- Cover surfaces with plastic or newspaper.
- Do this outside if possible – tie-dye is one of the easiest outdoor crafts for kids that the whole family can enjoy together.
With a few precautions, tie-dye makes for a safe, colorful family tie-dye party idea you can repeat all summer long.
FAQ Section
No – most tie-dye kits for kids are non-toxic and safe to use at home. Just remember that dye can stain your skin and clothing, so always wear gloves and old clothes when making DIY tie-dye shirts or other projects. We recommend this non-toxic liquid tie dye kit.
Natural fibers like cotton or rayon work best because they absorb dye evenly. White or light-colored fabrics are ideal for vibrant easy tie-dye patterns for kids.
To keep your DIY tie-dye shirts looking bright, rinse thoroughly in cold water after the dye has set. Adding a cup of white vinegar to the rinse water can help set the colors. Wash separately from other clothes and line-dry to extend the life of your outdoor craft creations.
Choose a non-toxic liquid tie-dye kit designed for families. These kits are safe, easy to use, and perfect for tie-dye parties with kids or rainy-day at-home activities.
Wash your shirt in cold water, hang it to dry, and avoid direct sunlight for long periods. These steps will help your family tie-dye projects stay colorful for years.
Yes! Rubber bands and squeeze bottles can be reused for future tie-dye projects with kids. Just wash them thoroughly with soap and water before storing.
Absolutely – mixing colors is part of the fun! Experiment with different shades to create unique DIY tie-dye shirts or accessories. Just be sure to mix enough dye to cover your entire project.
Yes, you can use natural dyes like beet juice or turmeric for kid-friendly tie-dye projects, but results may be less vibrant and shorter-lasting than commercial kits. Always do a test patch first.
Practice different folds, color combos, and dye techniques. Watching step-by-step tie-dye tutorials with your kids can also help them see what to expect before starting their own design.
Definitely! Try socks, beach towels, pillowcases, bandanas, or tote bags. These make perfect DIY crafts for kids and are great for a family tie-dye party on a summer afternoon.

Calie Herbst, Editor-in-Chief of Milwaukee With Kids, has spent over a decade combining her experiences as a parent of three to create a hub for Milwaukee’s family adventures.
Her decade-long teaching career in Milwaukee Public Schools and academic background, including a Master’s in Teaching from Marquette University and dual B.A.s in Sociology and Spanish from the University of Wisconsin – Madison, fuel her passion for inclusive and engaging family content.
Calie is also a recognized voice in local media, contributing to WISN Channel 12 News, WTMJ Wisconsin Morning News, Fox 6’s Real Milwaukee, and B93.3.
Discover more about Calie’s journey and editorial approach on her About Page and Editorial Policy Page.
")


")
