
Save This For Later
Looking for cold weather science experiments for kids that actually work in real winter conditions?
These hands-on winter experiments use snow, ice, freezing temperatures, and simple household supplies to help kids explore concepts like freezing points, phase changes, and chemical reactions — without complicated setups or classroom prep.
Whether it’s bitter cold outside or you’re snowed in and stuck indoors, these easy winter science experiments are designed for elementary-age kids and curious learners of all ages.
👉 Looking for more ideas year-round? Here are 100 Easy Science Experiments for Kids!
Quick Picks: Cold Weather Science Experiments
Best for extreme cold days:
Frozen Bubbles, Instant Snow (Boiling Water Experiment)
Best edible experiment:
Maple Syrup Snow Candy
Best outdoor snow experiment:
Snow Volcano, Snow Density Test
Best indoor winter experiment:
Crystal Snowflakes, Homemade Thermometer
Best quick setup (10 minutes or less):
Sub-Zero Slushies, Ice Fishing with Salt
1. Maple Syrup Snow Candy
A classic winter experiment that turns hot syrup into chewy candy using nothing but snow and cold air. Kids get a sweet treat while learning how temperature affects sugar and liquids.
What You’ll Need
- Clean, fresh snow
- 100% pure maple syrup
- Small saucepan
- Spoon or popsicle sticks
Steps
- Pack clean snow into a shallow pan or baking dish.
- Heat maple syrup in a saucepan until just bubbling and slightly thickened.
- Carefully drizzle the hot syrup directly onto the snow.
- Wait about 30–60 seconds, then lift the candy with a spoon or stick.
Science Takeaway
Sugar lowers the freezing point of liquids, allowing hot syrup to rapidly cool and solidify into a candy-like texture instead of freezing solid.
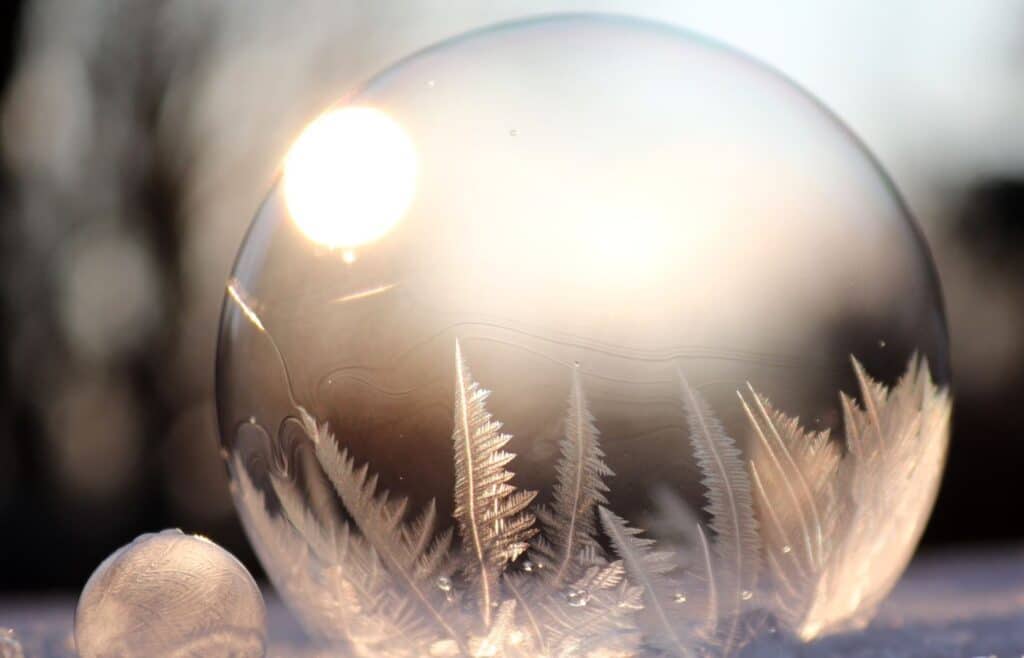
2. Frozen Bubbles
On extremely cold days, soap bubbles can freeze mid-air and form delicate ice crystal patterns. It’s one of the most visually striking cold weather science experiments.
What You’ll Need
- Bubble solution
- Bubble wand or straw
- Very cold outdoor temperatures
- Calm weather (little wind)
Steps
- Go outside on a bitterly cold, calm day.
- Blow a bubble gently and watch closely as it lands or floats.
- Observe ice crystals forming across the surface of the bubble.
Science Takeaway
Cold temperatures cause the water in the bubble to freeze while soap molecules hold the bubble’s shape long enough for crystals to form.
Works best below 10°F — anything warmer and the bubbles usually pop before freezing.
3. Ice Magnifying Glass
This simple experiment turns ice into a working lens, showing kids how light bends and magnifies objects.
What You’ll Need
- Small bowl or plastic container
- Water
- Freezer
- Flashlight or sunlight
- Printed text or small object
Steps
- Fill the container with water and freeze until solid.
- Remove the ice and let the surface smooth slightly.
- Hold the ice over text or an object and adjust the distance until it magnifies.
Science Takeaway
Ice bends light as it passes through, acting like a magnifying lens through refraction.
4. Snow Volcano
This winter twist on a classic experiment combines snow with a bubbling chemical reaction kids never get tired of.
What You’ll Need
- Fresh snow
- Small cup or bottle
- Baking soda
- Vinegar
- Food coloring (optional)
Steps
- Pack snow around the cup to form a volcano shape.
- Add baking soda to the cup.
- Mix vinegar with food coloring and pour it in.
- Watch the eruption flow down the snowy sides.
Science Takeaway
An acid–base reaction creates carbon dioxide gas, causing the foamy “eruption.”
Messy but forgiving — great for mixed-age siblings.
5. Instant Snow: The Boiling Water and Freezing Air Experiment
This dramatic experiment shows how extreme cold can turn hot water into ice crystals almost instantly.
What You’ll Need
- Boiling water
- Heat-safe container
- Outdoor space
- Extremely cold temperatures
Steps
- Bring water to a full boil.
- Go outside to an open area.
- Carefully toss the water upward and away from people.
- Watch it flash-freeze into a cloud of ice crystals.
Science Takeaway
Hot water evaporates quickly, and the tiny droplets freeze almost instantly in subzero air.
Quiet judgment: Only worth trying on truly subzero days — otherwise it’s just hot water.
6. Sub-Zero Slushies
A quick, edible experiment that demonstrates how sugar affects freezing.
What You’ll Need
- Clean snow
- Juice or sports drink
- Cup and spoon
Steps
- Fill a cup with snow.
- Pour juice over the snow until just saturated.
- Stir and watch it turn slushy almost immediately.
Science Takeaway
Sugar lowers the freezing point, preventing the mixture from freezing solid.
7. Frosty Patterns: Saltwater Art
This experiment turns freezing temperatures into natural artists, creating delicate frost patterns as saltwater freezes.
What You’ll Need
- Cardboard or thick paper
- Water
- Table salt
- Paintbrush
Steps
- Mix salt into water until it no longer dissolves.
- Use a paintbrush to paint designs onto cardboard.
- Place the artwork outside in freezing temperatures.
- Watch as frosty patterns form while the water freezes.
Science Takeaway
Salt lowers the freezing point of water, changing how ice crystals form and creating unique patterns as the water freezes.
8. Ice Fishing with Salt and String
This simple experiment feels like magic and teaches kids how melting and refreezing can happen at the same time.
What You’ll Need
- Ice cubes or a slab of ice
- Table salt
- String
Steps
- Place ice on a flat surface.
- Lay the string across the ice.
- Sprinkle salt over the string and wait 1–2 minutes.
- Gently lift the string — the ice should come up with it.
Science Takeaway
Salt melts ice by lowering its freezing point, then the water refreezes around the string as the salt dissolves.
Short wait times matter — if you rush it, the ice won’t refreeze around the string.
9. Snow Density Test
This hands-on experiment helps kids explore how tightly packed snow changes weight and hardness.
What You’ll Need
- Several containers
- Fresh snow
- Optional: kitchen scale
Steps
- Fill each container with snow, packing it down firmly.
- Leave containers outside or in the freezer until frozen.
- Remove the snow blocks and compare their size and hardness.
- Weigh them if you have a scale.
Science Takeaway
Packing snow removes air between particles, increasing density and making the frozen block heavier and harder.
10. Homemade Thermometer
Build a working thermometer to show how liquids expand and contract with temperature changes.
What You’ll Need
- Clear plastic bottle
- Rubbing alcohol
- Water
- Food coloring
- Clear straw
- Modeling clay or playdough
Steps
- Fill the bottle partway with equal parts alcohol and water.
- Add food coloring.
- Insert the straw without touching the bottom.
- Seal around the straw with clay.
- Move the bottle between warm and cold environments and watch the liquid rise and fall.
Science Takeaway
Liquids expand when warm and contract when cold, causing the liquid level to move in the straw.
11. Crystal Snowflakes
Grow sparkling crystals overnight and watch how solids form from solutions.
What You’ll Need
- White pipe cleaners
- Borax
- Boiling water
- Jar or vase
- String and pencil
Steps
- Twist pipe cleaners into a snowflake shape.
- Dissolve borax into boiling water until saturated.
- Suspend the snowflake in the solution without touching the sides.
- Leave overnight and observe crystal growth.
Science Takeaway
As the solution cools and water evaporates, dissolved particles form solid crystals.
Best as an overnight experiment — rushing it leads to smaller crystals.
Cold weather doesn’t have to send kids straight to screens. With a little snow, ice, or freezing air, winter becomes a hands-on science lab — whether you’re outside for five minutes or stuck inside waiting for a storm to pass.
These cold weather science experiments are simple enough to try on a whim, but rich enough to spark questions, curiosity, and real learning.
More Science Fun Resources
- 50 Mind-Blowing Fourth Grade Science Experiments: Perfect for young scientists in the making.
- 25 Best Science Books For Your 1st Grader: Spark curiosity with these fantastic reads.
- 100 Science Trivia Questions For Kids: Test your knowledge with these fun and challenging questions.
FAQ: Cold Weather Science Experiments
Some of the easiest and most reliable cold weather science experiments include snow volcanoes, sub-zero slushies, maple syrup snow candy, and ice fishing with salt and string. These experiments use simple supplies and work in a wide range of winter conditions.
Frozen bubbles require very cold temperatures and calm air. If it’s warmer than about 10°F or windy, bubbles will usually pop before they freeze. For best results, try again on a calm, bitterly cold day.
Not always. Some experiments, like crystal snowflakes, homemade thermometers, and ice fishing with salt, can be done indoors using a freezer. Others, like frozen bubbles or instant snow, require outdoor freezing temperatures.
Most cold weather science experiments work well for elementary-age kids (ages 5–10), with supervision. Many can be simplified for preschoolers or expanded with measurements and predictions for older kids.
Salt lowers the freezing point of water, which causes ice to melt even when temperatures are below freezing. This same principle is used on winter roads — and it’s why salt-based experiments are so effective for kids.
It depends on the experiment:
Below 32°F: snow-based experiments, slushies, salt and ice
Below 10°F: frozen bubbles
Subzero: instant snow (boiling water experiment)
Most cold weather science experiments are safe with basic supervision, especially when working with ice, snow, or household ingredients. Experiments involving boiling water or extreme cold should always be handled by an adult.

Calie Herbst, Editor-in-Chief of Milwaukee With Kids, has spent over a decade combining her experiences as a parent of three to create a hub for Milwaukee’s family adventures.
Her decade-long teaching career in Milwaukee Public Schools and academic background, including a Master’s in Teaching from Marquette University and dual B.A.s in Sociology and Spanish from the University of Wisconsin – Madison, fuel her passion for inclusive and engaging family content.
Calie is also a recognized voice in local media, contributing to WISN Channel 12 News, WTMJ Wisconsin Morning News, Fox 6’s Real Milwaukee, and B93.3.
Discover more about Calie’s journey and editorial approach on her About Page and Editorial Policy Page.

")


